Wednesday, December 23, 2009

Winter Riding in Monterey


M. and I have established a little bit of tradition of going down to the Monterey peninsula in December to spend a weekend chilling out. These tourist hot spots--Monterey, Carmel, Big Sur--in the summer turn into quiet and low-key destinations in the winter time. For one thing, cost to get a hotel room goes way down--we got a room in Carmel proper for less than $70 a night at a clean and cute place--and so does car traffic. And if weather cooperates--which it did this past weekend--then you actually get possibly even nicer weather than the summer time, and this area is prone to heavy fog and overcast sky.


We went down on Saturday and visited a friend in Carmel. We sat on a bench on the water and chatted, walked along Scenic Dr in Carmel, and went down to Rocky Point Restaurant in Big Sur for afternoon snack and enjoy breath-taking views of the coast and the famous Bixby Bridge. We came back to the hotel just after dark. Feeling much relaxed, we actually fell asleep before 9PM.


We got up next morning when it was still dark and got ready to go out for a short ride. This is M.'s second real ride on her way to full recovery from her knee injury. She didn't want tons of mileage, but wanted some more climbing than when we did a ride in Mendocino during Thanksgiving weekend. We got out of the hotel and climbed up to HWY 1. We got on to HWY 1 for a short while and turned off to get on Aquajito Road. The road is lined with trees and goes up for about two miles before descending down to north Monterey near the Naval Post-Graduate Academy. M. did well on the climb up, and enjoyed being able to ride hills again. We got on the Monterey-Seaside trail and went south. We saw a few other cyclists going the other direction.

The next 10-12 miles are pretty flat, as we rolled through the usually-busy areas of fisherman's wharf, Cannery Row, Lovers' Point, various beautiful state beaches, and of course the famous 17-mile drive. Car traffic was pretty minimal and we took in as much as the gorgeous ocean view as we could, and stopped occasionally to look at seals lying on nearby rocks.


We exited 17-mile drive and rode toward the Carmel Mission along Scenic Dr in Carmel. If you haven't ridden/walked on Scenic Dr before, next time when you visit the area it's a must. It's a stretch of ocean front road that connects the beach at the bottom of Ocean Ave and Carmel River State Beach. We turned north again after reaching the Carmel Mission. The way back to the hotel is a steady climb on Lasuen/Junipero Road. This is actually the most hilly part of the ride. The quiet but quaint neighborhoods provide a contrast to the expansive and busier water front scenes, but is quite enjoyable to ride and watch on a sunday morning. We rode past our hotel to climb the hill on Aquajito one more time before heading back to clean up and checked out.

In the afternoon we met up with our friend again and took a walk in Point Lobos, which is a former whaling cove and now a state reserve. And we sat on the beach for a little while longer to soak up more relaxation before heading back to the Bay Area. The riding was easy-going but extremely pleasant, and it was overall a very wonderful weekend.

The rest of the pictures are shown in the slideshow

Sunday, December 13, 2009

Raleigh One Way Build List and Pictures

Build Notes:
Assembling a fixed gear bike is considerably easier than a modern geared bike. You don't have to fiddle with front and rear derailleurs, shifters, and all the cables/housings connecting these drive train components. The building on the One Way was pretty easy. It took me three hours total to build the wheels and less than 2 hours for the rest of the stuff. The part that took the most time is the installation of the SOMA front rack and the Tanaka alloy fenders.

I used a clamp on brake-bridge bracket for the rear fender, which saved me some time to measure and drill two holes to mount the L-bracket that came with the fenders. The fender--45mm wide--was too wide to fit between chainstay. Instead of cutting the fenders, I used a flat bracket to create another mounting point slightly above the chainstay bridge, similar to a mounting point on a kickstand plate. Drilling and putting on the fender stay was not easy, but straightforward enough.

Accessories around the front wheel--fender and rack--were harder to deal with. The Soma Rack is quite nice, feels sturdy enough and still light, but probably wasn't designed for a lower-trail fork. I bent the steel tang that connects the brake hole on the fork crown to the rack so it doesn't dip below the bottom of the fork crown and press down on the fender. I also drilled a hole on the fender and to use one of the two bolts the rack has to secure the tang and bolt the fender to the rack. The process of figuring out the exact position of the hole and keeping the fender line OK was not an easy one. At the end, the front rack still tilts up a little but the resultant set up isn't bad, and look quite nice. And with 3 points of connection, the fender should not rattle.

I recommend the Soma rack. It's light, has decent finish, and the platform is of a good size. The platform is bigger than a regular canti-post--mounted front rack, but smaller than a full out porter rack. A wald basket would sit on top of it nicely. It's fairly easy to set up--with a vice grip or a large crescent wrench you can bend the tang to fit your bike, and they go onto eyelets at the fork drop out. To set up with fenders, especially metal ones take a little more mechanical facility and patience.

The Tanaka fenders are a pretty nice; they are nicely polished, feel solid--definitely feel a little better than the VO fenders. I am not sure if they are as nice as the Honjos but they are definitely cheaper. They are, however, a little short, so for extensive riding in wet conditions mud-flaps might be helpful.

The IRO Cycles hubs, that are reputed to be made by Formula in Taiwan look very nice. They spin smoothly. Formula has good reputation in making track hubs. I like the pink color, wasn't able to get one for the rear at bargain basement price. I built the wheels up with a pair of slightly used Mavic CXP22 rims. These don't have eyelets on the outside. This combination dictates 288mm spokes.

Frameset: 2009 Raleign 1-way frame/fork; 55cm top tube
Control/Cockpit  
Handlebar: Soma Oxford Bars 
bar grips: generic cork grip
Headset: Cane Creek 9/8" headset 
Stem: Easton E50 110mm 26.0 clamp 
Front Brake: Avid Shorty 4 cantilever; black;
Rear brakes: Tektro Oryx 
Brake levers: Shimano mountain brake levers (both left) 
seatpost: generic 27.2mm black seatpost 
saddle: specialized old saddle
housings et al: scraps 
cables: Mountain brake cable

 
Drivetrain bottom bracket: generic 68x107mm JIS bottom bracket 
Crankset: FSA RPM 155mm black 110 BCD cranksets 
Chainring bolts: generic bolts for 1 ring 
Chainring: SR Steel 42T 110bcd ring 
freewheel: ACS 22T singlespeed freewheel 
Track Cog: Soma 18T 3/32" cog 
Lock Ring: Dura Ace track cog lock ring chain 
KMC: 8-speed chain Pedals: MKS Touring pedals
Wheels 
rear hub: IRO high flange fixed/free hub 120mm OLD silver 32h 
front hub: IRO high flange front hub 100mm OLD, pink, 32h 
rear rim: Mavic CXP22 32h black 700c 
front rim: Mavic CXP22 32h black 700c 
Spokes: 64 DT Swiss straight gauge 14g spokes 
Tubes: generic tubes Rim Tape: Come with rims 
Tires: Panaracer Pasela Tourguard 32mm
Accessories 
fenders: Tanaka alloy fenders 700cx45mm 
Front Rack: Soma inexpensive front rack 
Bottle Cages: Generic aluminum bottle cages 

The rest of the pictures are here.

Thursday, December 10, 2009

Raleigh One Way and My Fixed Bug

I sold my fixed-gear bike earlier this year to make room for the incoming Kogswell and Ebisu. Soon after I picked up my Ebisu and built it up in March, I also unloaded my Rivendell Romulus because the P/R and the Ebisu cover Romulus's functions well. I had a wonderful riding season and really like both the Ebisu and the Kogswell.

I did really miss riding a fixed gear bike, though, especially as winter approaches and rain started to come down. So when I saw a fellow iBOB list member put a Raleigh One Way up for sale, I contacted him. After some negotiation we reached an agreement on price. I sent the money out and 10 days later I got the frameset and a few other parts.

I came across the Raleigh One Way as I was searching for a suitable but inexpensive fixed-gear frameset. I didn't want a track frames as they really don't provide adequate tire clearance and have no provisions for racks and fenders (and even brakes). Several single-speed specific roadish frames exist on the market--Soma Rush and Delancy, Surly Steamroller, Kona Paddy Wagon, and Gunnar Street Dogs--and they have various accommodations for brakes, fenders and racks. However, even the best of these frames can only accommodate 28mm tires with fenders. After riding my 650b bikes with 40mm tires on them all year, 28mm seems too skinny by comparison.

The only production single-speed specific frames I found that have good amount of braze-ons and good tire clearance are Rivendell Quickbeam, On-one il Pompino (the bike I sold earlier), and Raleigh One Way. Rivendell Quickbeams are really nice, and if I have more disposable cash I would have gone to Walnut Creek and picked up a silver one when Grant and Co. released this last batch. Of the remaining two choices, the Raleigh has a nicer fork, and one that has more off-set leading to a lower-trail geometry suitable for carrying front loads. It is also more roadish than the Pompino, which has 135mm rear drop-out spacing. (after I purchased the One Way I came across the IRO Phoenix, which also satisfy my criteria, and seems like a good production frameset).

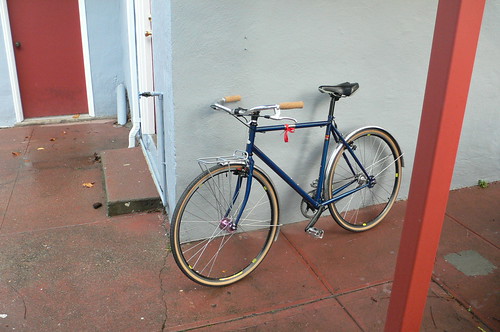
My first impression of the One Way when I received the frame is that the deep dark blue color is really nice. As I unpacked the frame of wrapping materials, I began to notice how stout the tubes are--this is definitely an over-built steel frame. After riding mostly standard-size tubings on my geared bikes this year, the One Way will definitely provide a contrast in that department. I cleaned up the frame a little and stashed it away, as I have to wait for a few important parts to arrive to complete the build.

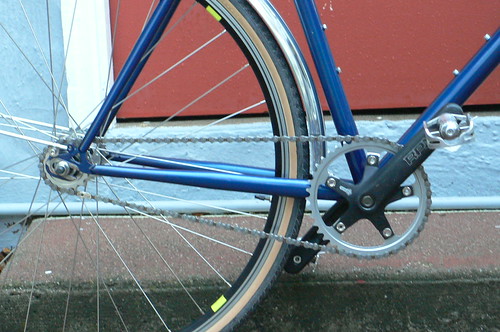
I try to use as many parts as I already have in the parts bin. The frameset package included frame, fork, headset, seatpost, and front brake. I rummage through my parts bin and came up with a rear brake, crank arms, track cog and lock ring, and tires and tubes. The SF Bike Expo Bike Swap took place after I bought the frameset, and I picked up brake levers, bottom bracket, chain ring bolts, and stem at the swap. I also got a 650c Mavic CXP22 rim thinking that it was 700c. I put it on Craigslist right the way and was able to find someone to swap rims with. Metin in Palo Alto had a set of 700c CXP22 rims and wanted a 650c rim for a tri-bike. I gave him $20 for the set in exchange for my lone 650c rim--it worked out well for me.

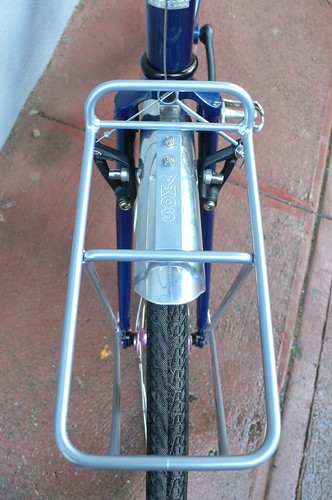
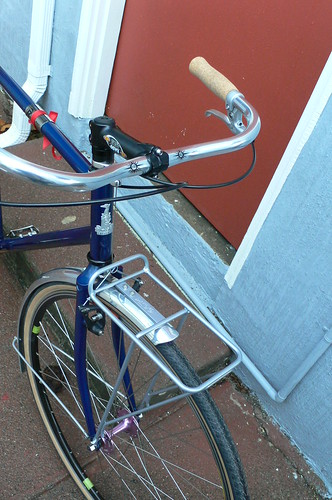
I shopped around for the remaining parts, and got good deals on many of them. I scored a pair of hubs from IRO Cycles, and found good deals for pedals, chains, freewheel, and fenders at Outside Outfitter (an online retailer). I bought the handlebar, spokes, racks, and water bottle cages at local bike shops.

I assembled the bike sans wheels, chain, rack, and fenders. I received the hubs today and will build the wheels up in the next day or two. Racks and fenders will go up after that.

I will post pictures and report on first impressions in the next post.

Note:
The link to Raleigh's website shows a 2009 One Way. The 2010 version is white, and uses a SRAM Torpedo hub--a singlespeed hub that can become a fixed gear with a few turns of a screw. 2009 One Ways, incidentally, are on sale at REI.com at the moment for $630. You have to pay tax, but not shipping since you have to pick up at a REI store anyway. I like the frameset option as it gives me more flexibility to configure the bike to the way I want it to be.